树莓派从3B开始就是64位cpu,但是官方系统一直都是32位的,直到2020-05-28才发布64位beta版,在此之前我除了使用基地的64位系统之外也自己构建过,这篇文章将详细讲一下如何从零开始构建自己的树莓派64位系统。
数据无价,本教程的操作有一定的风险,开始前请备份重要数据!!!
树莓派官方系统是基于Debian的,所以我们也选择Debian Buster进行构建。整个构建过程可以在安装Linux系统的PC或服务器上进行,也可以在64位树莓派上进行(推荐使用基地2.0最新的u3),我使用x64平台的Ubuntu 20.04进行演示,过程中我会说明与使用树莓派不同的地方,没有说明的就是通用的。
一、准备镜像
我们首先来创建镜像文件,这次我们构建的是lite系统不包含桌面环境,所以我创建一个3G的镜像(其实2G就够),这里可以根据自己定制的需要改变镜像的大小。
为了避免频繁使用sudo,全程使用root用户操作。
#切换到root
sudo -i

#更新系统软件
apt update
apt upgrade

#安装所需要的软件
apt install kpartx

#创建一个工作目录,所有工作都在此目录进行
mkdir debian

cd debian

#创建镜像文件buster.img
dd if=/dev/zero of=buster.img bs=3G count=0 seek=1

#给镜像文件分区
cfdisk buster.img树莓派系统镜像有两个分区,一个boot分区类型为FAT32,一个rootfs根分区类型为ext4,下面开始分区
进入cfdisk交互模式后,选择dos类型: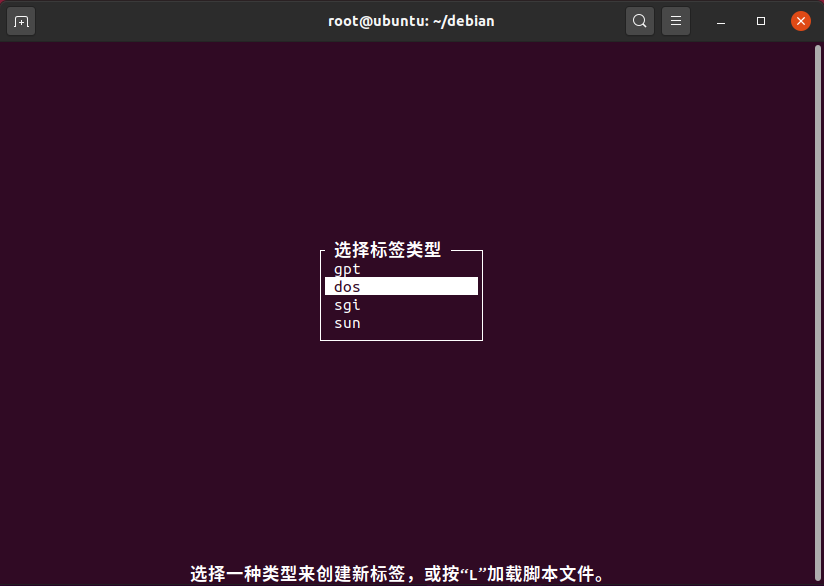
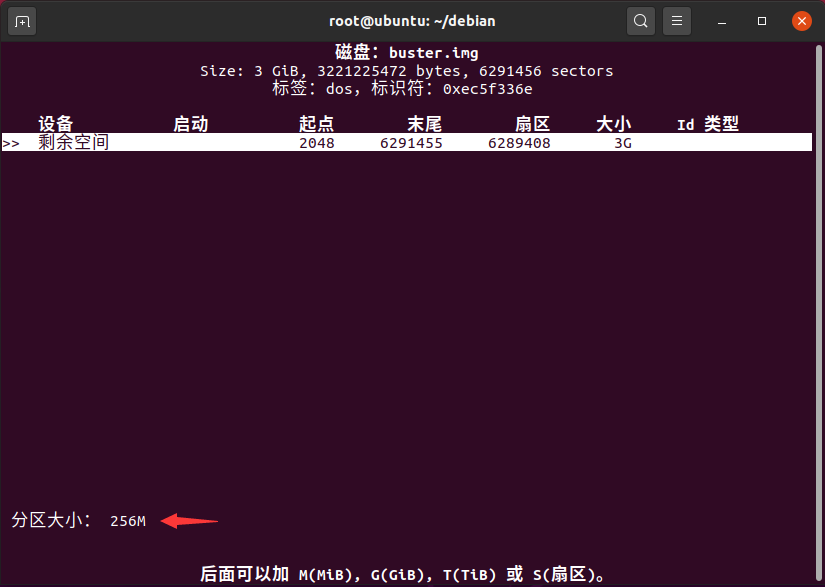
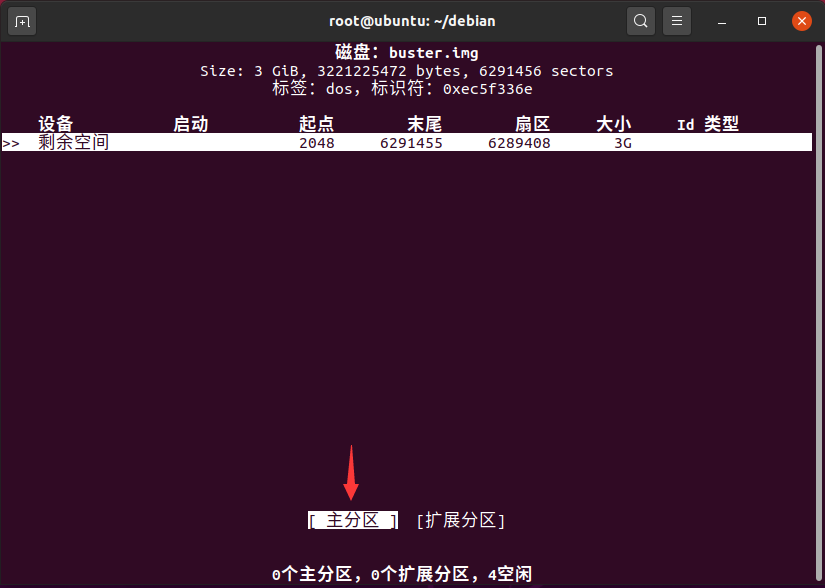
然后用左右键选择新建,输入分区大小256M,类型选择主分区: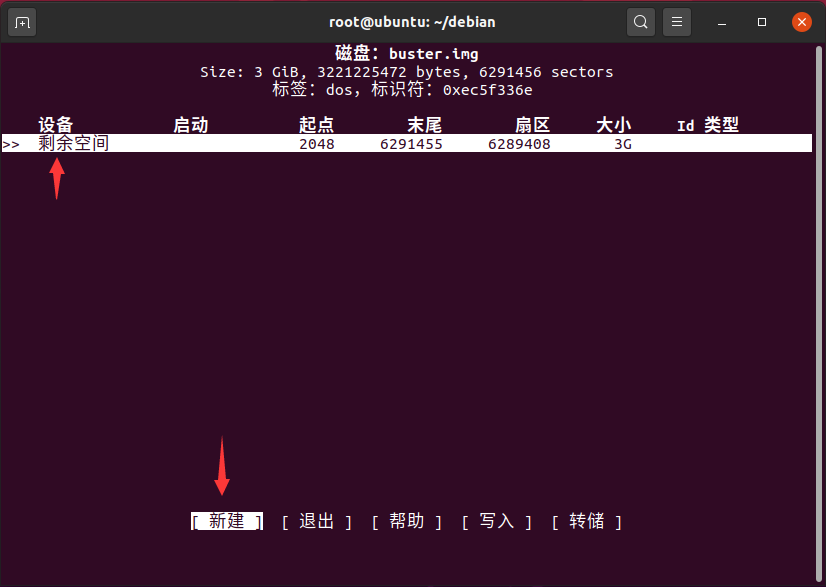
然后用上下键选择刚刚创建的256M分区,左右键选择类型,弹出对话框选择类型c: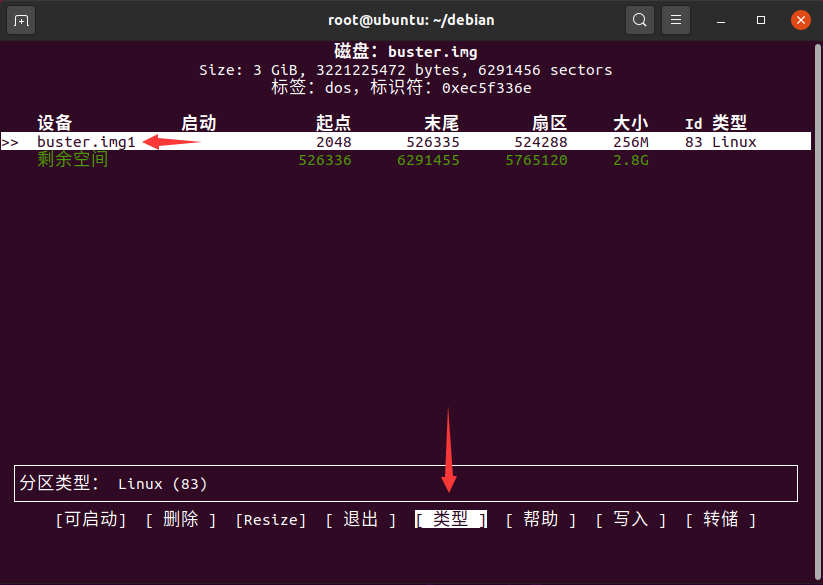
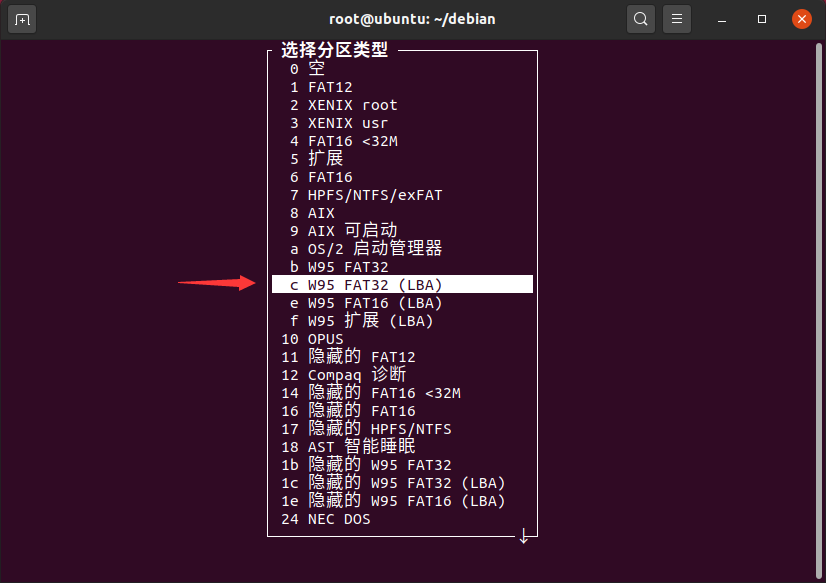
然后在剩余空间上选择新建,分区大小默认,类型选择主分区: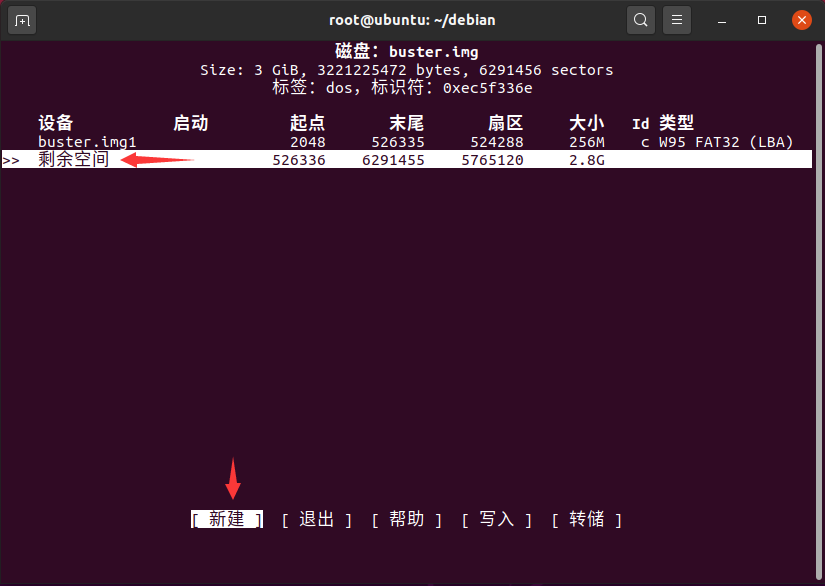
然后有左右按键选写入,提示输入yes: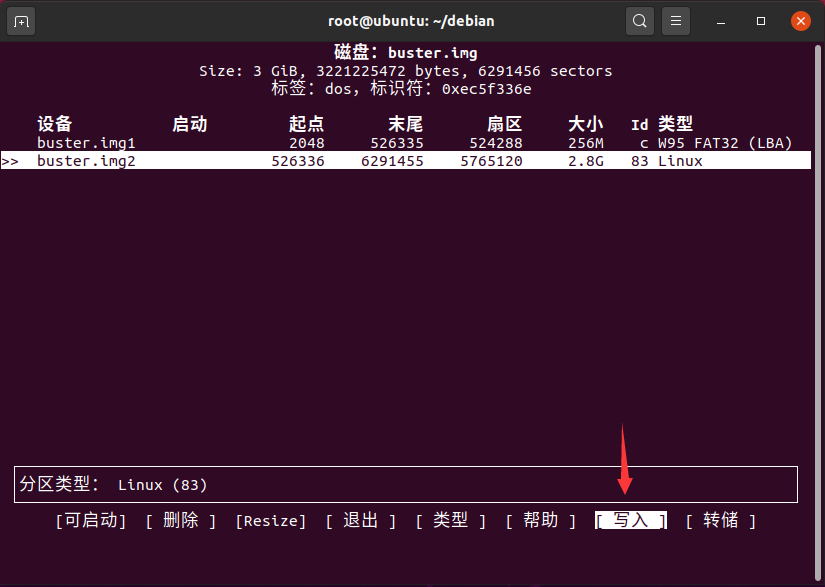
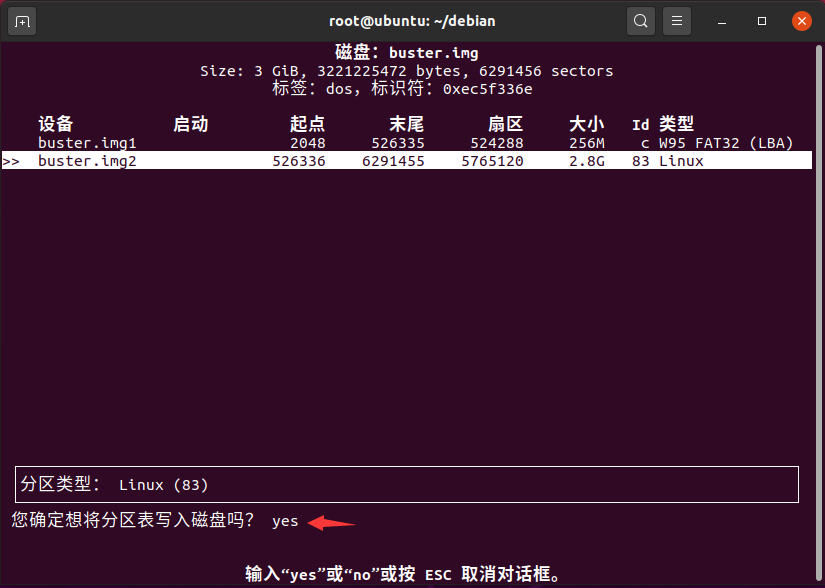
然后按q键或者选择退出。
镜像分区完成,现在开始格式化镜像:
#挂载镜像文件
losetup -f --show buster.img执行完上面的挂载命令会得到一个输出,表示挂载的loop设备: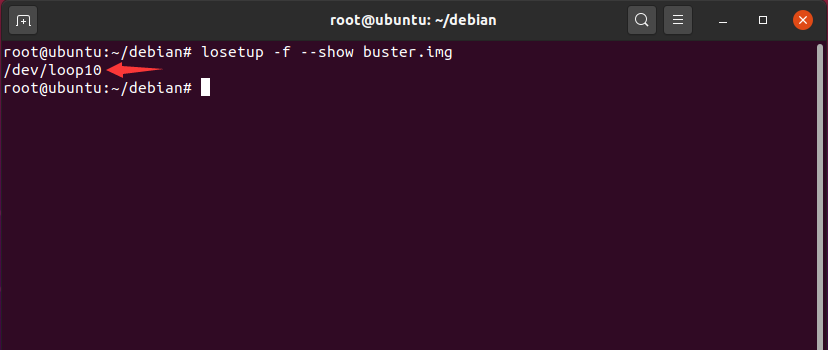
我这里是/dev/loop10,你的结果可能跟我不一样,在下面的命令中请将这个值替换为自己的结果。
#挂载镜像文件两个分区设备
kpartx -va /dev/loop10执行完上面的命令会把两个分区设备映射到/dev/mapper/下,具体设备名称看自己的输出: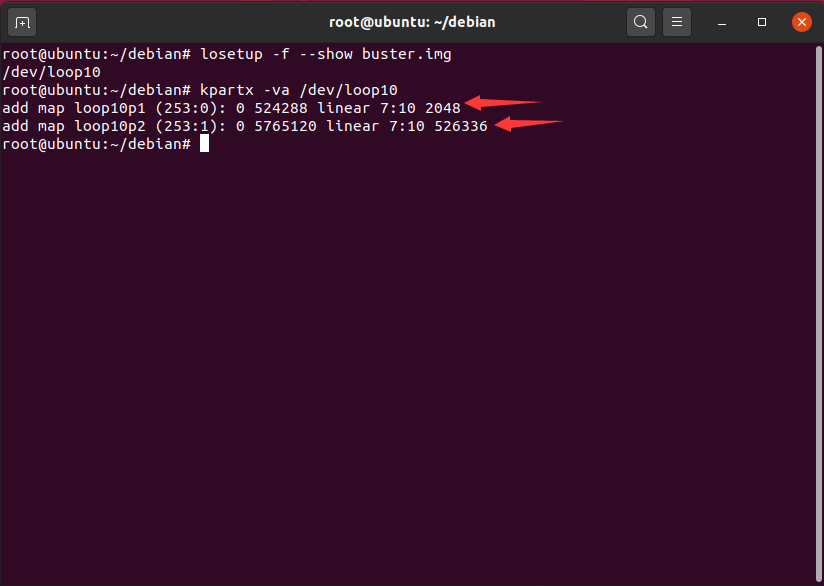
我的结果表明,镜像第一个分区设备为/dev/mapper/loop10p1,第二个分区设备为/dev/mapper/loop10p2
格式化两个分区,注意替换自己的设备名称:
#格式化boot分区
mkfs.fat -F 32 -n "boot" /dev/mapper/loop10p1

#格式化rootfs,设置label
mkfs.ext4 -L rootfs /dev/mapper/loop10p2
创建两个挂载点并挂载两个分区:
mkdir boot rootfs

#挂载boot
mount /dev/mapper/loop10p1 boot/

#挂载rootfs
mount /dev/mapper/loop10p2 rootfs/执行lsblk确认一下挂载情况: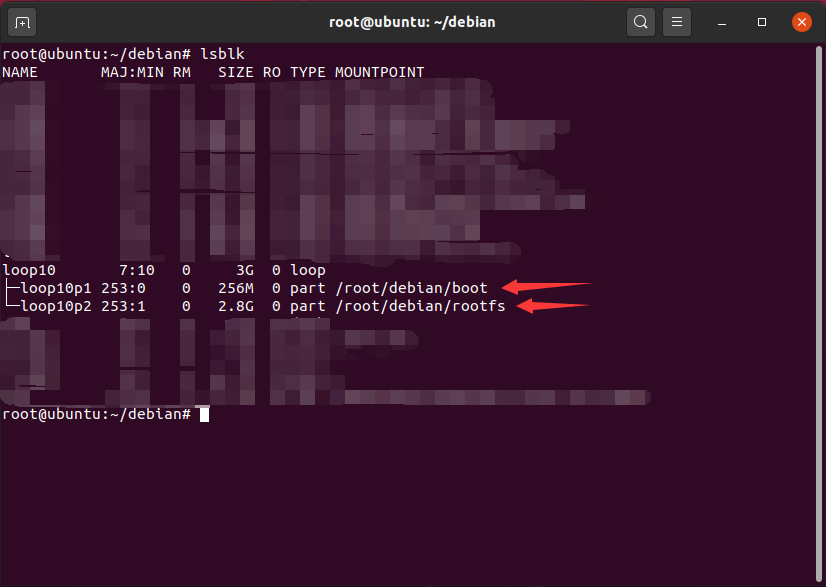
镜像准备完毕。
二、rootfs构建
现在开始rootfs的构建
#安装所需要的软件
#x64平台
apt install debootstrap qemu-user-static

#树莓派
apt install debootstrap

#使用debootstrap构建基础系统
#--arch=arm64指定目标架构
#buster表示要构建的发行版
#rootfs/表示构建目录
#https://mirrors.tuna.tsinghua.edu.cn/debian/ 表示使用的源

#x64执行
#--foreign表示异构系统构建
debootstrap --arch=arm64 --no-merged-usr --foreign buster rootfs/ https://mirrors.tuna.tsinghua.edu.cn/debian/

#树莓派执行
debootstrap --arch=arm64 --no-merged-usr buster rootfs/ https://mirrors.tuna.tsinghua.edu.cn/debian/

#下载驱动
wget https://linuxer.top/usr/uploads/2020/06/firmware.tar.xz

#解压驱动
tar -Jxvf firmware.tar.xz -C rootfs/lib/

#下载固件
wget -O rpi-firmware.tar.gz https://github.com/Hexxeh/rpi-firmware/tarball/master
mkdir rpi-firmware
tar -zxvf rpi-firmware.tar.gz -C rpi-firmware --strip-components 1
cp -r rpi-firmware/vc/hardfp/opt/vc rootfs/opt/
cp -r rpi-firmware/vc/sdk/opt/vc rootfs/opt/执行blkid /dev/mapper/loop10*,根据结果编辑rootfs/etc/fstab文件: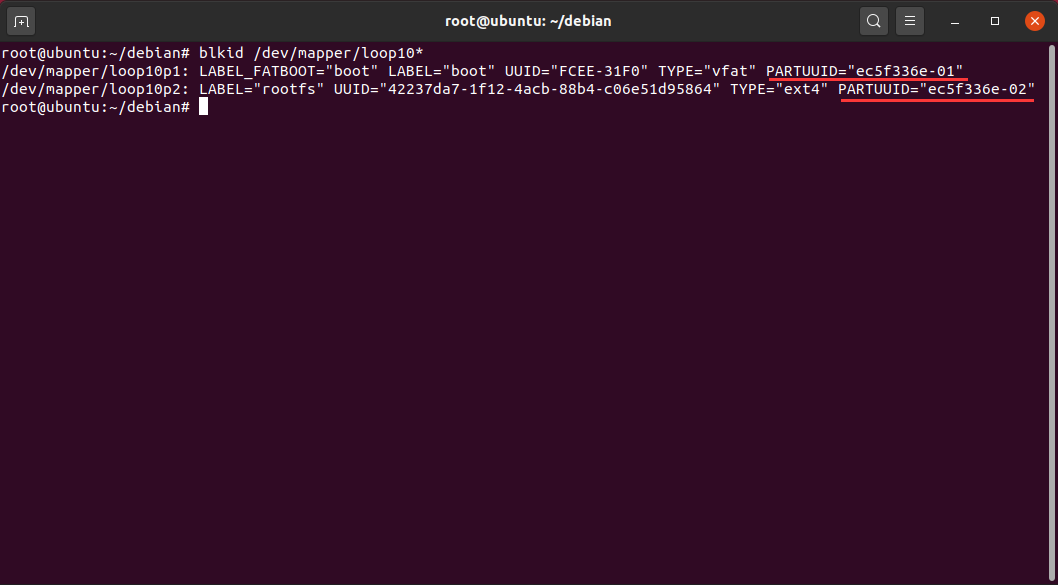
我的rootfs/etc/fstab文件内容如下,大家根据实际情况修改:
proc            /proc           proc    defaults          0       0
PARTUUID=ec5f336e-01  /boot           vfat    defaults          0       2
PARTUUID=ec5f336e-02 / ext4 defaults,noatime 0 1改为清华源,编辑rootfs/etc/apt/sources.list,修改为以下内容:
deb http://mirrors.tuna.tsinghua.edu.cn/debian/ buster main non-free contrib
deb http://mirrors.tuna.tsinghua.edu.cn/debian-security buster/updates main
deb http://mirrors.tuna.tsinghua.edu.cn/debian/ buster-updates main non-free contrib
deb http://mirrors.tuna.tsinghua.edu.cn/debian/ buster-backports main non-free contrib扩容脚本,创建rootfs/usr/sbin/init_resize.sh,写入以下内容:
#!/bin/sh

reboot_pi () {
  umount /boot
  mount / -o remount,ro
  sync
  if [ "$NOOBS" = "1" ]; then
    if [ "$NEW_KERNEL" = "1" ]; then
      reboot -f "$BOOT_PART_NUM"
    else
      echo "$BOOT_PART_NUM" > "/sys/module/${BCM_MODULE}/parameters/reboot_part"
    fi
  fi
  echo b > /proc/sysrq-trigger
  sleep 5
  exit 0
}

check_commands () {
  if ! command -v whiptail > /dev/null; then
      echo "whiptail not found"
      sleep 5
      return 1
  fi
  for COMMAND in grep cut sed parted fdisk findmnt; do
    if ! command -v $COMMAND > /dev/null; then
      FAIL_REASON="$COMMAND not found"
      return 1
    fi
  done
  return 0
}

check_noobs () {
  if [ "$BOOT_PART_NUM" = "1" ]; then
    NOOBS=0
  else
    NOOBS=1
  fi
}

get_variables () {
  ROOT_PART_DEV=$(findmnt / -o source -n)
  ROOT_PART_NAME=$(echo "$ROOT_PART_DEV" | cut -d "/" -f 3)
  ROOT_DEV_NAME=$(echo /sys/block/*/"${ROOT_PART_NAME}" | cut -d "/" -f 4)
  ROOT_DEV="/dev/${ROOT_DEV_NAME}"
  ROOT_PART_NUM=$(cat "/sys/block/${ROOT_DEV_NAME}/${ROOT_PART_NAME}/partition")

  BOOT_PART_DEV=$(findmnt /boot -o source -n)
  BOOT_PART_NAME=$(echo "$BOOT_PART_DEV" | cut -d "/" -f 3)
  BOOT_DEV_NAME=$(echo /sys/block/*/"${BOOT_PART_NAME}" | cut -d "/" -f 4)
  BOOT_PART_NUM=$(cat "/sys/block/${BOOT_DEV_NAME}/${BOOT_PART_NAME}/partition")

  OLD_DISKID=$(fdisk -l "$ROOT_DEV" | sed -n 's/Disk identifier: 0x\([^ ]*\)/\1/p')

  check_noobs

  ROOT_DEV_SIZE=$(cat "/sys/block/${ROOT_DEV_NAME}/size")
  TARGET_END=$((ROOT_DEV_SIZE - 1))

  PARTITION_TABLE=$(parted -m "$ROOT_DEV" unit s print | tr -d 's')

  LAST_PART_NUM=$(echo "$PARTITION_TABLE" | tail -n 1 | cut -d ":" -f 1)

  ROOT_PART_LINE=$(echo "$PARTITION_TABLE" | grep -e "^${ROOT_PART_NUM}:")
  ROOT_PART_START=$(echo "$ROOT_PART_LINE" | cut -d ":" -f 2)
  ROOT_PART_END=$(echo "$ROOT_PART_LINE" | cut -d ":" -f 3)

  if [ "$NOOBS" = "1" ]; then
    EXT_PART_LINE=$(echo "$PARTITION_TABLE" | grep ":::;" | head -n 1)
    EXT_PART_NUM=$(echo "$EXT_PART_LINE" | cut -d ":" -f 1)
    EXT_PART_START=$(echo "$EXT_PART_LINE" | cut -d ":" -f 2)
    EXT_PART_END=$(echo "$EXT_PART_LINE" | cut -d ":" -f 3)
  fi
}

fix_partuuid() {
  mount -o remount,rw "$ROOT_PART_DEV"
  mount -o remount,rw "$BOOT_PART_DEV"
  DISKID="$(tr -dc 'a-f0-9' < /dev/hwrng | dd bs=1 count=8 2>/dev/null)"
  fdisk "$ROOT_DEV" > /dev/null <<EOF
x
i
0x$DISKID
r
w
EOF
  if [ "$?" -eq 0 ]; then
    sed -i "s/${OLD_DISKID}/${DISKID}/g" /etc/fstab
    sed -i "s/${OLD_DISKID}/${DISKID}/" /boot/cmdline.txt
    sync
  fi

  mount -o remount,ro "$ROOT_PART_DEV"
  mount -o remount,ro "$BOOT_PART_DEV"
}

check_variables () {
  if [ "$NOOBS" = "1" ]; then
    if [ "$EXT_PART_NUM" -gt 4 ] || \
       [ "$EXT_PART_START" -gt "$ROOT_PART_START" ] || \
       [ "$EXT_PART_END" -lt "$ROOT_PART_END" ]; then
      FAIL_REASON="Unsupported extended partition"
      return 1
    fi
  fi

  if [ "$BOOT_DEV_NAME" != "$ROOT_DEV_NAME" ]; then
      FAIL_REASON="Boot and root partitions are on different devices"
      return 1
  fi

  if [ "$ROOT_PART_NUM" -ne "$LAST_PART_NUM" ]; then
    FAIL_REASON="Root partition should be last partition"
    return 1
  fi

  if [ "$ROOT_PART_END" -gt "$TARGET_END" ]; then
    FAIL_REASON="Root partition runs past the end of device"
    return 1
  fi

  if [ ! -b "$ROOT_DEV" ] || [ ! -b "$ROOT_PART_DEV" ] || [ ! -b "$BOOT_PART_DEV" ] ; then
    FAIL_REASON="Could not determine partitions"
    return 1
  fi
}

check_kernel () {
  MAJOR="$(uname -r | cut -f1 -d.)"
  MINOR="$(uname -r | cut -f2 -d.)"
  if [ "$MAJOR" -eq "4" ] && [ "$MINOR" -lt "9" ]; then
    return 0
  fi
  if [ "$MAJOR" -lt "4" ]; then
    return 0
  fi
  NEW_KERNEL=1
}

main () {
  get_variables

  if ! check_variables; then
    return 1
  fi

  check_kernel

  if [ "$NOOBS" = "1" ] && [ "$NEW_KERNEL" != "1" ]; then
    BCM_MODULE=$(grep -e "^Hardware" /proc/cpuinfo | cut -d ":" -f 2 | tr -d " " | tr '[:upper:]' '[:lower:]')
    if ! modprobe "$BCM_MODULE"; then
      FAIL_REASON="Couldn't load BCM module $BCM_MODULE"
      return 1
    fi
  fi

  if [ "$ROOT_PART_END" -eq "$TARGET_END" ]; then
    reboot_pi
  fi

  if [ "$NOOBS" = "1" ]; then
    if ! parted -m "$ROOT_DEV" u s resizepart "$EXT_PART_NUM" yes "$TARGET_END"; then
      FAIL_REASON="Extended partition resize failed"
      return 1
    fi
  fi

  if ! parted -m "$ROOT_DEV" u s resizepart "$ROOT_PART_NUM" "$TARGET_END"; then
    FAIL_REASON="Root partition resize failed"
    return 1
  fi

  fix_partuuid

  return 0
}

mount -t proc proc /proc
mount -t sysfs sys /sys
mount -t tmpfs tmp /run
mkdir -p /run/systemd

mount /boot
mount / -o remount,ro

sed -i 's| init=/usr/sbin/init_resize\.sh||' /boot/cmdline.txt
sed -i 's| sdhci\.debug_quirks2=4||' /boot/cmdline.txt

if ! grep -q splash /boot/cmdline.txt; then
  sed -i "s/ quiet//g" /boot/cmdline.txt
fi
mount /boot -o remount,ro
sync

echo 1 > /proc/sys/kernel/sysrq

if ! check_commands; then
  reboot_pi
fi

if main; then
  whiptail --infobox "Resized root filesystem. Rebooting in 5 seconds..." 20 60
  sleep 5
else
  sleep 5
  whiptail --msgbox "Could not expand filesystem, please try raspi-config or rc_gui.\n${FAIL_REASON}" 20 60
fi

reboot_pi给rootfs/usr/sbin/init_resize.sh赋执行权限:
chmod +x rootfs/usr/sbin/init_resize.sh第一次开机执行resize2fs扩容,创建rootfs/etc/init.d/resize2fs_once,写入以下内容:
#!/bin/sh
### BEGIN INIT INFO
# Provides:          resize2fs_once
# Required-Start:
# Required-Stop:
# Default-Start: 3
# Default-Stop:
# Short-Description: Resize the root filesystem to fill partition
# Description:
### END INIT INFO
. /lib/lsb/init-functions
case "$1" in
  start)
    log_daemon_msg "Starting resize2fs_once"
    ROOT_DEV=$(findmnt / -o source -n) &&
    resize2fs $ROOT_DEV &&
    update-rc.d resize2fs_once remove &&
    rm /etc/init.d/resize2fs_once &&
    log_end_msg $?
    ;;
  *)
    echo "Usage: $0 start" >&2
    exit 3
    ;;
esac给rootfs/etc/init.d/resize2fs_once赋执行权限:
chmod +x rootfs/etc/init.d/resize2fs_once创建rootfs/etc/rc.local,写入以下内容,实现开机自动执行,这里根据自己需求定制:
#!/bin/sh -e
#
#/usr/sbin/gen-server-key
#
# rc.local
#
# This script is executed at the end of each multiuser runlevel.
# Make sure that the script will "exit 0" on success or any other
# value on error.
#
# In order to enable or disable this script just change the execution
# bits.
#


exit 0给rootfs/etc/rc.local赋执行权限:
chmod +x rootfs/etc/rc.local有了基础系统之后我们chroot进行系统配置,由于我使用的x64平台跟arm64属于异构系统,所以这里要使用qemu进行模拟
x64平台:
#x64平台进行第二阶段构建
chroot rootfs/ debootstrap/debootstrap --second-stage

cp /usr/bin/qemu-aarch64-static rootfs/usr/bin/

#chroot进入基础系统
chroot rootfs/ /usr/bin/qemu-aarch64-static /bin/bash
树莓派:
#chroot进入基础系统
chroot rootfs/ /bin/bash到这里,我们已经chroot到rootfs目录中了,如果你出现了cannot change locale的错误,没关系,忽略就好了。
现在可以对基础系统进行配置了:
#添加32位软件支持
dpkg --add-architecture armhf

#更新系统软件
apt update
apt upgrade

#安装基础软件
apt install libc6:armhf
apt install locales rng-tools wpasupplicant dhcpcd5 sudo parted
apt install net-tools avahi-daemon dphys-swapfile ssh openssh-server
apt install htop bash-completion wget curl vim

#添加vc-userland支持
echo "/opt/vc/lib/"   >/etc/ld.so.conf.d/vc-userland.conf
cd /usr/bin/ ; for i in /opt/vc/bin/* ; do ln -sf $i ./ ; done ; cd /

#设置swap为1024M
#根据自己需求修改
sed -i "s/#CONF_SWAPSIZE=/CONF_SWAPSIZE=1024/g" /etc/dphys-swapfile

#设置扩容自动执行
update-rc.d resize2fs_once defaults

#设置内核参数
echo -e "kernel.printk = 3 4 1 3\nvm.min_free_kbytes = 16384" > /etc/sysctl.d/98-rpi.conf
echo -e "net.core.default_qdisc=fq\nnet.ipv4.tcp_congestion_control=bbr" >> /etc/sysctl.conf

#设置时区为上海
ln -sf /usr/share/zoneinfo/Asia/Shanghai /etc/localtime

#添加wpa_supplicant启动钩子
ln -sf /usr/share/dhcpcd/hooks/10-wpa_supplicant /lib/dhcpcd/dhcpcd-hooks/10-wpa_supplicant

#链接wpa_supplicant配置文件到boot分区,这样可以开机前配置wifi
ln -sf /boot/wpa_supplicant.conf /etc/wpa_supplicant/wpa_supplicant.conf

#设置主机名为raspberrypi
echo "raspberrypi" > /etc/hostname
echo -e "127.0.0.1\traspberrypi" >> /etc/hosts

#配置语言
dpkg-reconfigure locales在弹出窗口用空格选则en_US.UTF-8和zh_CN.UTF-8,然后tab键选择确定: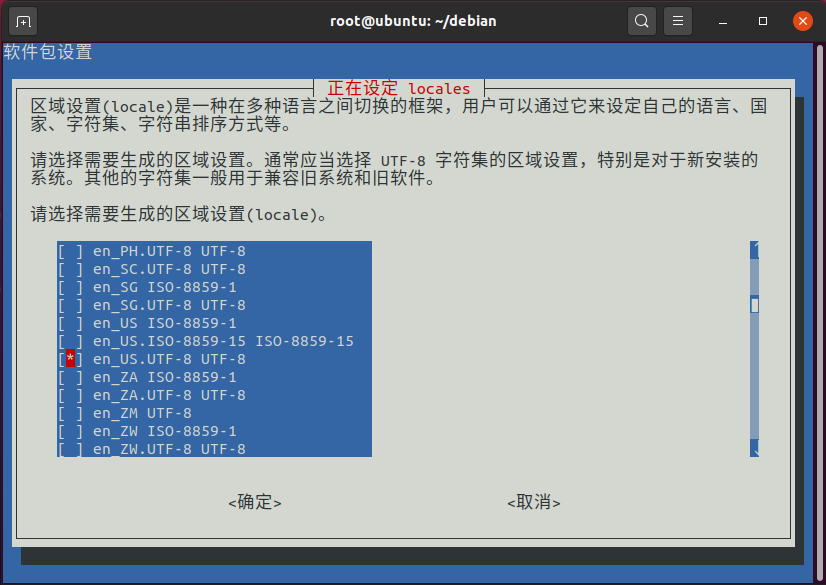
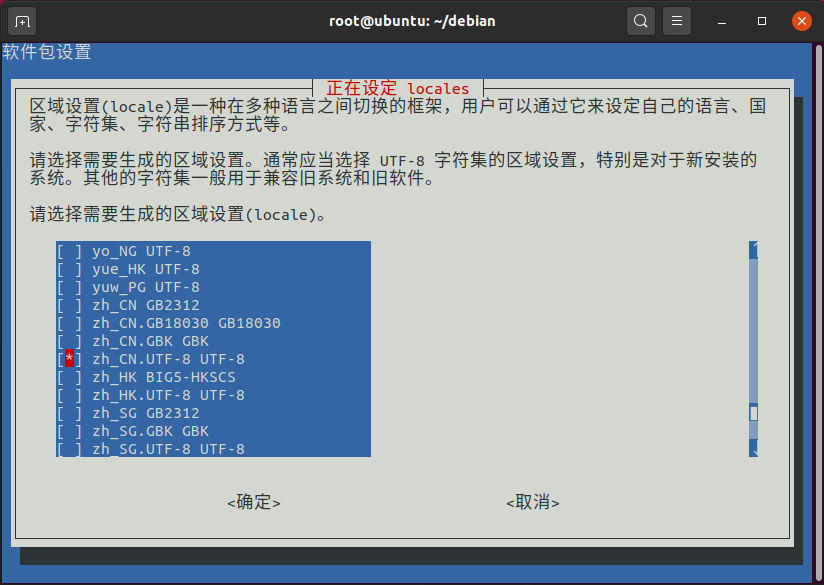
然后选择默认语言,我这里选择en_US.UTF-8,然后tab键选择确定: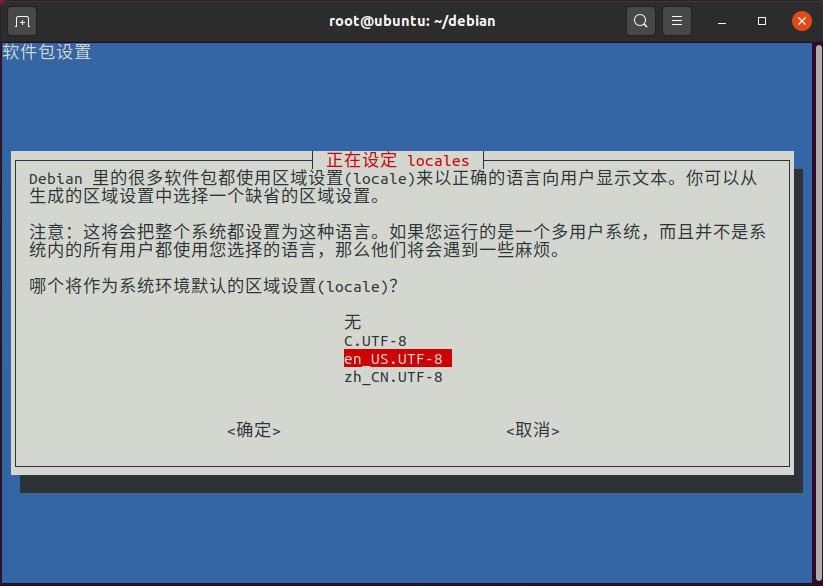
添加用户:
#添加用pi
useradd -m -s /bin/bash pi

#设置密码,输入两次确认
passwd pi

#给pi添加sudo权限
echo "pi ALL=(ALL:ALL) NOPASSWD: ALL" > /etc/sudoers.d/00_pi如果需要开启root用户ssh登录可以这样操作,不需要的可以忽略:
#修改root密码,输入两次确认
passwd

#开启root ssh登录
sed -i "s/#PermitRootLogin prohibit-password/PermitRootLogin yes/g" /etc/ssh/sshd_config
基本配置完成,下面配置一些定制内容,可以根据自己需求来,不需要的可以忽略:
#安装Git、python3
apt install git python3 python3-pip

#添加python3的gpio库
pip3 install RPi.GPIO镜像定制的需求在这里自由发挥,发挥完以后退出chroot环境:
sync

exit

#清除日志
echo > rootfs/root/.bash_history

sync
三、boot分区文件准备
现在开始准备boot分区的文件:
#拷贝BootLoader
cp rpi-firmware/bootcode.bin rpi-firmware/fixup* rpi-firmware/start* boot/执行blkid /dev/mapper/loop10p2,其中loop10p2替换为自己的设备名称,根据结果替换下面root=PARTUUID=的值。
创建boot/cmdline.txt,内容如下:
dwc_otg.lpm_enable=0 console=serial0,115200 console=tty1 root=PARTUUID=ec5f336e-02 rootfstype=ext4 elevator=deadline fsck.repair=yes rootwait init=/usr/sbin/init_resize.sh创建boot/config.txt,内容如下:
# For more options and information see
# http://rpf.io/configtxt
# Some settings may impact device functionality. See link above for details

arm_64bit=1

# uncomment if you get no picture on HDMI for a default "safe" mode
#hdmi_safe=1

# uncomment this if your display has a black border of unused pixels visible
# and your display can output without overscan
#disable_overscan=1

# uncomment the following to adjust overscan. Use positive numbers if console
# goes off screen, and negative if there is too much border
#overscan_left=16
#overscan_right=16
#overscan_top=16
#overscan_bottom=16

# uncomment to force a console size. By default it will be display's size minus
# overscan.
#framebuffer_width=1280
#framebuffer_height=720

# uncomment if hdmi display is not detected and composite is being output
#hdmi_force_hotplug=1

# uncomment to force a specific HDMI mode (this will force VGA)
#hdmi_group=1
#hdmi_mode=1

# uncomment to force a HDMI mode rather than DVI. This can make audio work in
# DMT (computer monitor) modes
#hdmi_drive=2

# uncomment to increase signal to HDMI, if you have interference, blanking, or
# no display
#config_hdmi_boost=4

# uncomment for composite PAL
#sdtv_mode=2

#uncomment to overclock the arm. 700 MHz is the default.
#arm_freq=800

# Uncomment some or all of these to enable the optional hardware interfaces
#dtparam=i2c_arm=on
#dtparam=i2s=on
#dtparam=spi=on

# Uncomment this to enable the lirc-rpi module
#dtoverlay=lirc-rpi

# Additional overlays and parameters are documented /boot/overlays/README

# Enable audio (loads snd_bcm2835)
dtparam=audio=on

[pi4]
# Enable DRM VC4 V3D driver on top of the dispmanx display stack
dtoverlay=vc4-fkms-v3d
max_framebuffers=2

[all]
#dtoverlay=vc4-fkms-v3d
创建boot/wpa_supplicant.conf,实现开机前配置wifi,内容如下:
ctrl_interface=DIR=/var/run/wpa_supplicant GROUP=netdev
update_config=1
country=CN

network={
    ssid="wifi名称"
    psk="wifi密码"
    key_mgmt=WPA-PSK
    priority=1
}如果不需要配置wifi,在上面文件每一行前面加一个#注释掉即可。
四、内核构建
树莓派开机logo也是在内核中修改,需要的可以参考下文
https://linuxer.top/archives/replace-raspi-logo.html
现在开始内核编译,首先clone官方内核代码到本地:
#安装git
apt install git

#clone代码
#我们clone默认分支,版本是4.19.y
#需要其他分支 添加 -b 分支名称
git clone --depth=1 https://github.com/raspberrypi/linux修改EXTRAVERSION实现自定义内核版本号,修改linux/Makefile文件第5行:
EXTRAVERSION = -kevin这样内核的版本显示为4.19.y-kevin,这里根据自己需求修改。
开始编译,如果使用x64请参考1、交叉编译,使用树莓派编译请参考2、树莓派编译。
1、交叉编译
#配置交叉编译环境
apt install build-essential gcc-aarch64-linux-gnu bc bison flex libssl-dev make libc6-dev libncurses5-dev

#进入源码目录
cd linux

#配置内核
make ARCH=arm64 CROSS_COMPILE=aarch64-linux-gnu- bcm2711_defconfig

#如果想对内核做一些配置可以执行此命令
#在弹出框里可以配置内核各种参数
#这里不做展开,相关资料自行查阅
#保持默认参数可以跳过此命令
make ARCH=arm64 CROSS_COMPILE=aarch64-linux-gnu- menuconfig

#开始编译
#这里会花费一定的时间,具体看你电脑配置
#-j4 后面的4可以改成cpu核心数加快编译
make ARCH=arm64 CROSS_COMPILE=aarch64-linux-gnu- -j4


#安装内核模块
make ARCH=arm64 CROSS_COMPILE=aarch64-linux-gnu- INSTALL_MOD_PATH=../rootfs modules_install

#拷贝内核到boot分区
cp arch/arm64/boot/Image ../boot/kernel8.img

#拷贝dtb到boot分区
cp arch/arm64/boot/dts/broadcom/*.dtb ../boot/

#拷贝overlays到boot分区
cp -r arch/arm64/boot/dts/overlays/ ../boot/
2、树莓派编译
使用树莓派编译时cpu几乎会满载,如果你有其他服务正在运行,建议先停掉。
配置编译环境:
apt install tmux build-essential bc bison flex libssl-dev make libc6-dev libncurses5-dev如果你树莓派是ssh登录的,我强烈建议你使用tmux或者screen创建新会话来编译,我这里选择tmux:
#进入源码目录
cd linux

#创建新会话kernel
tmux new -s kernel

#配置内核
make ARCH=arm64 bcm2711_defconfig

#如果想对内核做一些配置可以执行此命令
#在弹出框里可以配置内核各种参数
#这里不做展开,相关资料自行查阅
#保持默认参数可以跳过此命令
make ARCH=arm64 menuconfig

#开始编译
#这里会花费很长时间,可以出去休息一会
#我用4b4g大约90分钟左右
make ARCH=arm64 -j4

#退出tmux
exit

#安装内核模块
make ARCH=arm64 INSTALL_MOD_PATH=../rootfs modules_install

#拷贝内核到boot分区
cp arch/arm64/boot/Image ../boot/kernel8.img

#拷贝dtb到boot分区
cp arch/arm64/boot/dts/broadcom/*.dtb ../boot/

#拷贝overlays到boot分区
cp -r arch/arm64/boot/dts/overlays/ ../boot/

#如果ssh连接断开可以重新连接切换到root执行以下命令重连
#编译过程不会中止
#没断开自然更好,可以忽略此命令
tmux attach -t kernel
至此内核编译完成。
五、收尾
最后做一些收尾工作:
cd ../

sync

#卸载镜像分区挂载
umount boot/
umount rootfs/

#注意/dev/loop10改为自己的挂载设备
kpartx -d /dev/loop10
losetup -d /dev/loop10
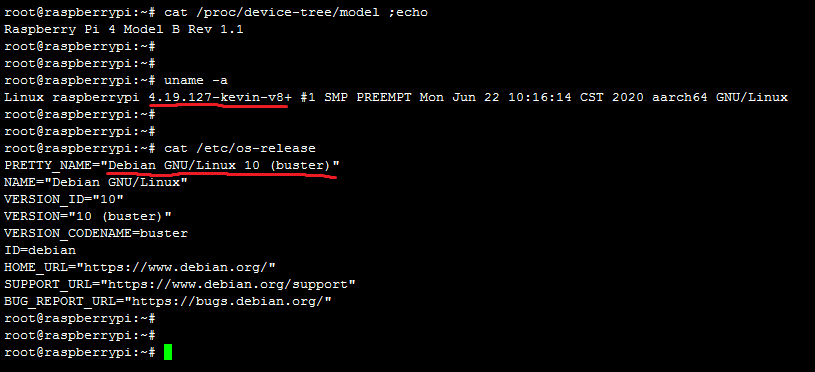
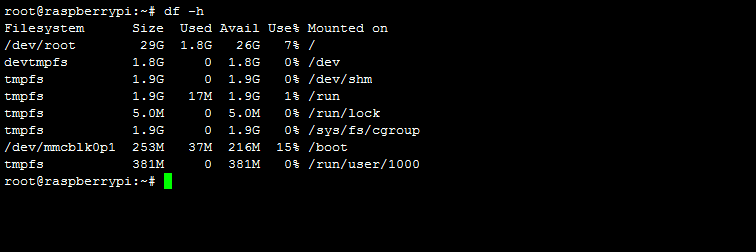
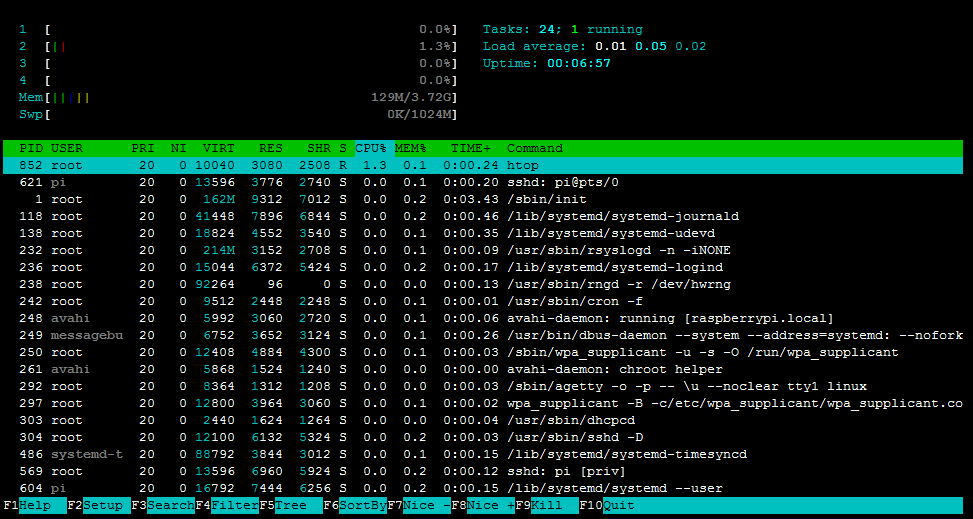
到这里我们的镜像就算做好了,兼容3B、3B+、4B,现在把buster.img刷到卡上验证一下。

2020年初就想总结一下,一拖拖了半年了,终于写完了,一身轻松~~
都是野路子让大佬们见笑了~
本文为原创文章,版权归 Kevin's Blog 所有,转载请联系博主获得授权。

Talk is cheap. Show me the code.
学习了学习了!